
This guide explains how to create a new Windows Server 2025 virtual machine in Microsoft Hyper-V from scratch. It is written for a practical small-business server setup where the physical server acts as the Hyper-V host and the virtual machine will later be used for SQL Server, IIS, testing, or another Windows Server role.
The example below creates a Generation 2 VM named SQL2025-PROD, attaches a Windows Server 2025 ISO file, creates a 150 GB virtual hard drive, connects the VM to an external Hyper-V switch, and starts the Windows installation.
Before You Start
You need a physical Windows Server 2025 machine with the Hyper-V role installed or ready to install. You also need a Windows Server 2025 ISO file saved somewhere on the host server. In this example, the ISO is located here:
C:\VMs\Windows2025.isoFor a test machine, placing VM files on the C: drive is acceptable. For production, it is usually better to keep the host operating system on C: and place virtual machine files on a larger or faster drive, such as D:.
Step 1: Install the Hyper-V Role
Open PowerShell as Administrator and run:
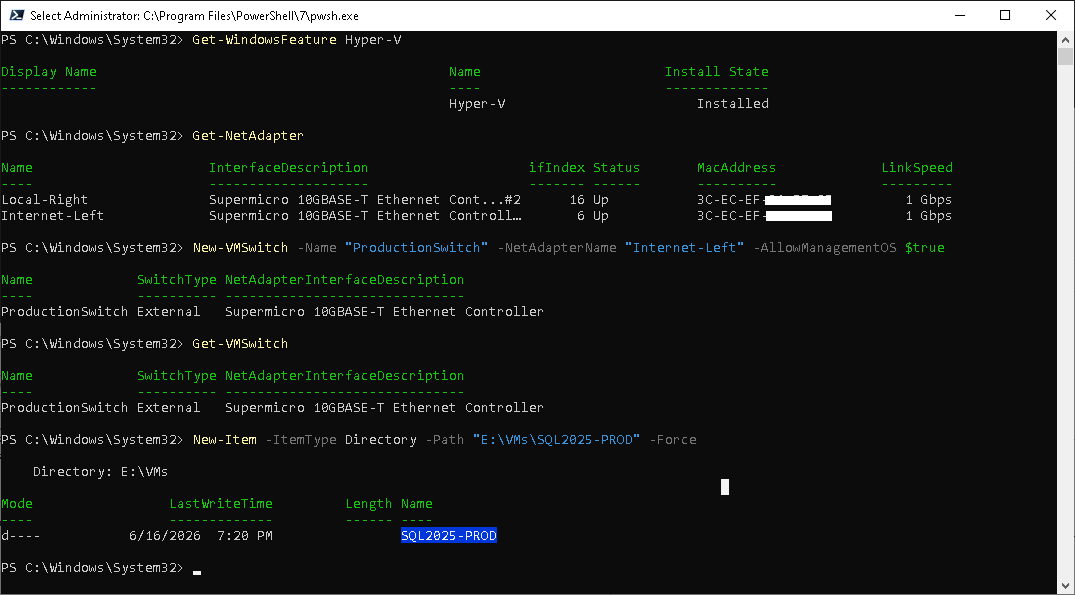
Install-WindowsFeature -Name Hyper-V -IncludeManagementTools -RestartThe server will restart if Hyper-V was not already installed.
Step 2: Confirm Hyper-V Is Installed
After the reboot, open PowerShell as Administrator again and run:
Get-WindowsFeature Hyper-VYou want to see Hyper-V marked as installed.
Step 3: Check the Physical Network Adapter Name
Run this command:
Get-NetAdapterLook for the adapter connected to your normal network. In many cases, the name will simply be Ethernet.
Step 4: Create an External Virtual Switch
The virtual switch allows the VM to connect to the physical network. If your physical adapter is named Ethernet, run:
New-VMSwitch -Name "ProductionSwitch" -NetAdapterName "Ethernet" -AllowManagementOS $trueThe option -AllowManagementOS $true allows the physical host to keep using the same network adapter.
Confirm the switch exists:
Get-VMSwitchStep 5: Create the VM Folder
Create a folder for the VM files:
New-Item -ItemType Directory -Path "C:\VMs\SQL2025-PROD" -ForceFor production, consider using a larger storage volume instead, for example:
D:\VMs\SQL2025-PRODStep 6: Create the Virtual Machine
This command creates a Generation 2 VM, assigns 6 GB of startup memory, creates a 150 GB virtual hard drive, and connects the VM to the virtual switch named ProductionSwitch.
New-VM `
  -Name "SQL2025-PROD" `
  -Generation 2 `
  -MemoryStartupBytes 6GB `
  -NewVHDPath "C:\VMs\SQL2025-PROD\SQL2025-PROD_OS.vhdx" `
  -NewVHDSizeBytes 150GB `
  -SwitchName "ProductionSwitch"
The path C:\VMs\SQL2025-PROD\SQL2025-PROD_OS.vhdx is the virtual hard drive file stored on the host. Inside the VM, Windows Setup will see it as a blank 150 GB disk.
The setting -NewVHDSizeBytes 150GB means the virtual disk can grow up to 150 GB. This is normally enough for the VM operating system disk. SQL data and log files should usually go on separate virtual disks in production.
For a SQL Server VM, I would separate it like this:
OS disk:      120–150 GB
SQL data:     separate disk
SQL logs:     separate disk
SQL backups:  separate disk or separate backup location
Windows Server itself may install in much less space, but after real use you need room for:
- Windows Server installation
- Windows updates
- Component store / WinSxS
- Page file
- Crash dumps
- SQL Server program files
- Management tools
- Logs
- Temporary files
- Future patches and service packs
Step 7: Assign Virtual CPUs
For an SQL Server VM that you plan to license for 8 cores, keep the VM at 8 virtual CPUs:
Set-VMProcessor -VMName "SQL2025-PROD" -Count 8If you assign 10 virtual CPUs instead, SQL Server licensing may also need to cover 10 cores:
Set-VMProcessor -VMName "SQL2025-PROD" -Count 10Step 8: Disable Dynamic Memory
For a production SQL Server VM, fixed memory is usually preferred. For this test VM, 6 GB is acceptable. For production SQL, use more memory based on the workload.
Set-VMMemory -VMName "SQL2025-PROD" -DynamicMemoryEnabled $false -StartupBytes 6GBDynamic Memory lets Hyper-V change the VM’s RAM amount while it is running. For many ordinary VMs, that is useful. For SQL Server, it is usually not ideal.
SQL Server likes predictable memory. It uses RAM heavily for cache, query plans, buffers, temp work, and performance stability.
SQL Server expects to manage memory itself. It will cache database pages in RAM to reduce disk reads. If Hyper-V suddenly takes memory away, SQL may have to dump cache, which can cause slower queries and uneven performance.
Step 9: Attach the Windows Server ISO
Attach the Windows Server 2025 ISO as a virtual DVD drive:
Add-VMDvdDrive -VMName "SQL2025-PROD" -Path "C:\VMs\Windows2025.iso"Confirm it is attached:
Get-VMDvdDrive -VMName "SQL2025-PROD"Step 10: Set the ISO as the First Boot Device
$dvd = Get-VMDvdDrive -VMName "SQL2025-PROD"
Set-VMFirmware -VMName "SQL2025-PROD" -FirstBootDevice $dvd
Generation 2 VMs use UEFI boot. A Microsoft Windows Server 2025 ISO should usually boot with Secure Boot enabled.
Step 11: Start the VM
Start-VM -Name "SQL2025-PROD"Step 12: Open the VM Console
vmconnect.exe localhost "SQL2025-PROD"When you see this message, click inside the VM window and press a key quickly:
Press any key to boot from CD or DVD...Windows Server Setup should start. Install Windows Server normally onto the 150 GB virtual disk.
Step 13: After Windows Installation
After Windows Server is installed inside the VM:
- Set the Administrator password.
- Install Windows updates.
- Confirm network access.
- Rename the server if needed.
- Set a static IP address or DHCP reservation.
- Remove the ISO from the virtual DVD drive.
To remove the ISO:
Set-VMDvdDrive -VMName "SQL2025-PROD" -Path $nullStep 14: Confirm VM Settings
On the Hyper-V host, run:
Get-VM "SQL2025-PROD"
Get-VMProcessor "SQL2025-PROD"
Get-VMMemory "SQL2025-PROD"
Get-VMNetworkAdapter "SQL2025-PROD"
Inside the VM, you can also confirm the server name, CPU count, and network configuration:
hostname
Get-CimInstance Win32_Processor | Select-Object Name,NumberOfCores,NumberOfLogicalProcessors
Get-NetIPConfiguration
Recommended Production Storage Layout
For a production SQL Server VM, avoid putting everything into one virtual disk. A better design is to keep separate virtual disks for the operating system, SQL data, SQL logs, and backups.
OS disk:       150 GB
SQL data disk: size based on database needs
SQL log disk:  size based on transaction log needs
Backup disk:   optional
On the Hyper-V host, those disks can be stored as separate VHDX files, for example:
D:\VMs\SQL2025-PROD\SQL2025-PROD_OS.vhdx
D:\VMs\SQL2025-PROD\SQLData.vhdx
D:\VMs\SQL2025-PROD\SQLLogs.vhdx
D:\VMs\SQL2025-PROD\SQLBackups.vhdx
Inside the VM, Windows will see them as separate drives, such as C:, D:, L:, and B:.
Important Licensing Note
Windows Server 2025 Standard licensing can cover the Hyper-V host plus up to two Windows Server virtual machines when the physical host is properly licensed for all required physical cores and the host is used only to run and manage Hyper-V.
SQL Server licensing is separate. If SQL Server is installed in this VM and the VM has 8 virtual CPUs, SQL Server licensing should be planned around those assigned virtual cores. If the VM is increased to 10 virtual CPUs, SQL licensing may also need to cover 10 cores.
Quick Troubleshooting
If the VM shows a boot failure message, it usually means no bootable ISO is attached, the DVD drive is not first in the boot order, or the VM did not receive the “press any key” command in time.
Check the DVD drive:
Get-VMDvdDrive -VMName "SQL2025-PROD"Check the firmware and boot order:
Get-VMFirmware -VMName "SQL2025-PROD"Open the VM console with the correct syntax:
vmconnect.exe localhost "SQL2025-PROD"